

Changing your car oil at home can seem like a daunting task, but with the right guidance and tools, it can be a straightforward DIY project. Regular oil changes are essential for maintaining your engine’s health and overall vehicle performance. By taking this task into your own hands, you not only save money but also gain a better understanding of your car’s mechanics.
The process of changing your oil involves a few key steps: gathering the necessary supplies, draining the old oil, replacing the oil filter, and adding fresh oil. Each of these steps is crucial for ensuring that your engine runs smoothly and efficiently. This article will walk you through each phase in detail, providing useful tips and tricks to make the entire process simpler and more accessible.
Whether you’re a seasoned car enthusiast or a novice just starting out, learning how to change your car oil is a valuable skill. With a little patience and the right approach, you’ll find that this essential maintenance task is not only manageable but also rewarding. Let’s dive into the world of DIY oil changes and empower you to take control of your vehicle’s maintenance.
Essential Tools and Supplies for a Successful Oil Change
Changing your car’s oil at home can be a rewarding diy task, but having the right tools and supplies is crucial for a smooth process. Here’s a comprehensive list to ensure your oil change goes off without a hitch.
1. Oil Filter Wrench: This tool is essential for removing the old oil filter. It provides the grip needed to loosen and unscrew the filter without damaging it, making it a must-have for every diy oil change.
2. Socket Set: A complete socket set is necessary for removing the oil drain plug. Ensure you have the correct size for your vehicle to avoid stripping the bolt.
3. Oil Drain Pan: To collect the used oil during the drainage process, an oil drain pan is vital. Choose one that’s large enough to hold all the old oil, minimizing spills and mess.
4. New Oil Filters: Always replace the oil filter when changing your oil. Make sure to select a filter that is compatible with your car model for optimal performance.
5. Engine Oil: Selecting the right type and amount of oil is critical. Check your owner’s manual for specifications regarding viscosity and quantity.
6. Funnel: A funnel makes pouring new oil into the engine cleaner and more efficient, preventing spills that could cause damage or require cleanup.
7. Rags or Paper Towels: Having clean rags or paper towels on hand is useful for wiping up any spills, keeping your workspace tidy, and cleaning your hands.
8. Gloves: Protect your hands from dirt and oil by wearing disposable gloves. This will help you maintain hygiene and prevent any irritation from the oil.
9. Safety Glasses: Keep your eyes protected from any splashes or debris by wearing safety glasses. It’s an important precaution when working on your vehicle.
With these essential tools and supplies at your disposal, you’ll be well-equipped to perform a successful oil change right at home. Proper preparation will not only make the process easier but will also help ensure the longevity and health of your vehicle.
Step-by-Step Guide to Draining and Replacing Engine Oil
Changing your car oil at home can be a straightforward diy task when you follow these simple steps. Proper maintenance of engine oil is crucial for your vehicle’s longevity and performance. Here’s how to efficiently drain and replace engine oil.
Step 1: Gather Your Supplies
Before you begin, collect all necessary tools and materials. You will need a new oil filter, the correct type and amount of engine oil, a wrench, an oil catch pan, a funnel, and a filter wrench. Ensure you’re wearing gloves to keep your hands clean.
Step 2: Prepare Your Vehicle
Park your car on a flat surface and turn off the engine. Allow the engine to cool down for at least 30 minutes. Use wheel chocks to secure the tires and prevent the vehicle from rolling.
Step 3: Locate the Oil Drain Plug
Under your car, find the oil drain plug, typically located at the bottom of the oil pan. Ensure you have your oil catch pan positioned directly beneath it to collect the old oil.
Step 4: Drain the Old Oil
Using a wrench, carefully loosen and remove the drain plug. Allow the old oil to drain completely into the pan. This process may take a few minutes. Once drained, replace and tighten the drain plug securely.
Step 5: Replace the Oil Filter
Using a filter wrench, carefully remove the old oil filter. Before installing the new filter, apply a bit of new oil to the rubber gasket on the filter. This ensures a better seal and makes future removals easier. Install the new oil filter by hand until snug.
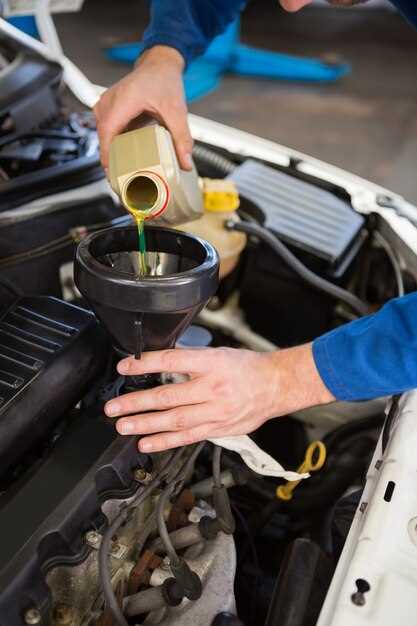
Step 6: Add New Engine Oil
Open the hood and remove the oil filler cap. Using a funnel, pour the new engine oil into the engine. Refer to your owner’s manual for the correct oil type and amount. Typically, you will want to add about 4-6 quarts, depending on your vehicle.
Step 7: Check Oil Level
After adding oil, wait a minute and then check the oil level using the dipstick. Pull the dipstick out, wipe it clean, reinsert, and remove again to check if the oil level is within the recommended range. If needed, add more oil.
Step 8: Final Steps
Replace the oil filler cap securely. Dispose of the old oil and oil filter properly at a recycling center. Start the engine and let it run for a few minutes to circulate the new oil, checking for leaks under the car. You have successfully changed your engine oil!
Troubleshooting Common Issues During DIY Oil Changes
Performing a diy oil change can seem intimidating, but understanding common issues can make the process smoother. Here are some typical challenges you might face and tips to resolve them.
1. Stripped Oil Drain Plug: Over-tightening the drain plug can lead to stripped threads. If this happens, try using a thread repair kit or a larger plug. In severe cases, you may need to replace the oil pan.
2. Oil Leaks: If you notice oil pooling under your car after a change, double-check the oil filter and drain plug for proper installation. Ensure the gasket on the oil filter is intact and try tightening the drain plug with the correct torque specifications.
3. Incorrect Oil Type: Using the wrong oil can affect engine performance. Always consult your vehicle’s manual for the recommended oil viscosity and specifications. This ensures optimal functioning and prolongs engine life.
4. Oil Filter Issues: If the oil filter is difficult to remove, try using an oil filter wrench. Additionally, when installing a new filter, apply a bit of oil on the gasket to ensure a proper seal and prevent leaks.
5. Messy Setup: A common issue during a diy oil change is creating a mess. To simplify cleanup, utilize an oil catch basin and keep rags handy to wipe spills immediately.
6. Forgetting to Change the Oil Filter: Always remember to change the oil filter during an oil change. Failing to do so can lead to oil contamination. Create a checklist to ensure all steps are completed.
By understanding these common issues and their solutions, you can confidently tackle your next change and maintain your vehicle’s health without unnecessary stress.


